1. JSX.IntrinsicElements


Typescript complains Property does not exist on type 'JSX.IntrinsicElements' when using React.createClass?

I am using typescript to write redux application. var item = React.createClass({ render: function() { return (

hello world
) } }); export default class ItemList extends


stackoverflow.com

Your component must start with a capital letter I instead of small letter i otherwise TypeScript would yell. Changing item to Item should fix it


2. 스크롤뷰 하단까지 도달 시 이벤트


Detect ScrollView has reached the end

I have a Text with long text inside a ScrollView and I want to detect when the user has scrolled to the end of the text so I can enable a button. I've been debugging the event object from the onSc...

stackoverflow.com


3. Navigation 버전 5에서 파라미터 pass


React Navigation 5 pass params to screen inside nested navigator

We are migrating an app in React Navigation 4 to React Navigation 5. The project has a BottomTabNavigator which has for one of its routes a nested TopTabNavigator with three tabs. One of the tabs i...

stackoverflow.com


4. Sequelize Group By & Join


Using group by and joins in sequelize

I have two tables on a PostgreSQL database, contracts and payments. One contract has multiple payments done. I'm having the two following models: module.exports = function(sequelize, DataTypes) ...

stackoverflow.com


4. 익스프레스와 Socket.io를 같은 포트


How to use ExpressJS and Socket.io on a same port?

In the third version of ExpressJS express.createServer() changed to express() this changes makes difficult to bind socket.io on a same port. Maybe somebody could find robust decision. Now, this do...

stackoverflow.com


1. react native 0.62 업데이트 후 multipart/form-data 업로드 안됨.


After upgrading from 0.61.4 to 0.62.0 the app will not upload files anymore from Android


https://github.com/facebook/react-native/issues/28551


React Native 0.62.* [TypeError: Network request failed] on file upload · Issue #28551 · facebook/react-native

Please provide all the information requested. Issues that do not follow this format are likely to stall. Description After upgrading from 0.61.4 to 0.62.0 the app will not upload files anymore from...

github.com


2. Image with auth Bearer

https://stackoverflow.com/questions/36675682/react-native-image-with-bearer-authentication-token


React Native Image with 'Bearer' authentication token

In React Native I can use images with

The problem is that user images are protected by JWT token which I pass in the hea...

stackoverflow.com


3. Warning with Async Storage


Warning: Async Storage has been extracted from react-native core…'?

https://stackoverflow.com/questions/55311228/how-to-remove-warning-async-storage-has-been-extracted-from-react-native-core


How to remove 'Warning: Async Storage has been extracted from react-native core...'?

I've already tried what's recommended in this screenshot by using this line of code import AsyncStorage from '../../../node_modules/@react-native-community/async-storage'; in the file where I'm

stackoverflow.com


npm i @react-native-community/async-storage
or
yarn add @react-native-community/async-storage


4. useSelector not updating when store has changed in Reducer

https://stackoverflow.com/questions/58850699/useselector-not-updating-when-store-has-changed-in-reducer-reactjs-redux


useSelector not updating when store has changed in Reducer. ReactJS Redux

I am changing the state in reducer. On debug I checked that the state was really changed. But the component is not updating. Component: function Cliente(props) { const dispatch = useDispatch(...

stackoverflow.com

the problem your facing is very common when handling with objects, the props do not change because you're changing an object property but the object itself does not change from the react side.

even when you're giving it a whole new object react doesn't see the property object change because the reference stays the same.


와우!

React Native - apple 로그인

개요

2020년 04월부터 App Store에 등록하려는 App은 Apple 로그인을 빼먹을 수 없게 되었다.

React Native에서의 구현(Type-Script)

ios 디바이스에 설치되는 application에서 Apple 계정 로그인 기능을 구현하려면 아래의 라이브러리를 설치해야만 한다.


React Native Apple Authentication

https://github.com/invertase/react-native-apple-authentication


invertase/react-native-apple-authentication

A React Native library providing support for Apple Authentication on iOS. - invertase/react-native-apple-authentication

github.com

npm install @invertase/react-native-apple-authentication


ios 폴더로 들어가 해당 라이브러리의 ios용 pod 또한 설치해준다.


cd ios && pod install


해당 라이브러리의 공식 github에서 제공하는 기본 login process는 다음과 같다.


import appleAuth, {
  AppleAuthRequestOperation,
  AppleAuthRequestScope,
  AppleAuthCredentialState,
  AppleAuthError
} from '@invertase/react-native-apple-authentication';

async function onAppleButtonPress() {
  // performs login request
  const appleAuthRequestResponse = await appleAuth.performRequest({
    requestedOperation: AppleAuthRequestOperation.LOGIN,
    requestedScopes: [AppleAuthRequestScope.EMAIL, AppleAuthRequestScope.FULL_NAME],
  });

  // get current authentication state for user
  const credentialState = await appleAuth.getCredentialStateForUser(appleAuthRequestResponse.user);

  // use credentialState response to ensure the user is authenticated
  if (credentialState === AppleAuthCredentialState.AUTHORIZED) {
    // user is authenticated
  }
}


에러를 catch 하고, 로그인이 확인(Authorized)됬을 때의 동작을 위해 아래와 같이 작성한다.


import appleAuth from '@invertase/react-native-apple-authentication';

// 2021년 01월 30일 수정되었습니다.
    const appleLogin = async() => {
        try {
            // performs login request
             const appleAuthRequestResponse = await appleAuth.performRequest({
               requestedOperation: appleAuth.Operation.LOGIN,
               requestedScopes: [appleAuth.Scope.EMAIL, appleAuth.Scope.FULL_NAME],
             });
           
             // get current authentication state for user
             const credentialState = await appleAuth.getCredentialStateForUser(appleAuthRequestResponse.user);
           
             // use credentialState response to ensure the user is authenticated
             if (credentialState === appleAuth.State.AUTHORIZED) {
               // user is authenticated
               	   console.log(appleAuthRequestResponse);
             }
           
           } catch (error) {
               if (error.code === appleAuth.Error.CANCELED) {
                   // login canceled
               } else {
                   // login error
               }
        }
    }


appleAuthRequestResponse 객체의 비구조화 할당(destructuring assignment)을 통해 identityToken, email, user을 선언한다. 주의해야할 점은 email값은 최초 한번의 로그인 때만 email을 반환하고, 이후로는 null 값을 반환한다는 것이다. identityToken 내부에 email에 대한 정보가 있으므로 걱정하지 않아도 된다. 또한, unique한 값이 필요하다면 user를 사용하면 된다.


identityToken은 Apple Login Token으로써 JWT(JASON Web Token) 기반이다. 이 identityToken안에 있는 정보는 https://jwt.io/ 에서 Decode하면 확인할 수 있다.


jwt을 decode 할 수 있는 라이브러리는 다음과 같다.

https://www.npmjs.com/package/jwt-decode


jwt-decode

Decode JWT tokens, mostly useful for browser applications.

www.npmjs.com

npm install jwt-decode


사용법은 아래와 같다.


import jwtDecode from 'jwt-decode';

const token = 'eyJ0eXAiO... /// jwt token';
const decoded = jwtDecode(token);
console.log(decoded);

/* prints:
 * { foo: "bar",
 *   exp: 1393286893,
 *   iat: 1393268893  }
 */


jwt decode 기능을 삽입하기 위해 우선 jwt의 구조를 interface로 선언해준다.


interface tokenType {
    aud: string,
    auth_time: number,
    c_hash: string,
    email: string,
    email_verified: string,
    exp: number,
    iat: number,
    is_private_email: string,
    iss: string,
    nonce: string,
    nonce_supported: boolean,
    sub: string
}


전체 코드는 다음과 같다.


import appleAuth from '@invertase/react-native-apple-authentication';
import jwtDecode from 'jwt-decode';

interface tokenType {
    aud: string,
    auth_time: number,
    c_hash: string,
    email: string,
    email_verified: string,
    exp: number,
    iat: number,
    is_private_email: string,
    iss: string,
    nonce: string,
    nonce_supported: boolean,
    sub: string
}

// 2021년 01월 30일 수정되었습니다.
    const appleLogin = async() => {
        try {
            // performs login request
             const appleAuthRequestResponse = await appleAuth.performRequest({
               requestedOperation: appleAuth.Operation.LOGIN,
               requestedScopes: [appleAuth.Scope.EMAIL, appleAuth.Scope.FULL_NAME],
             });
           
             // get current authentication state for user
             const credentialState = await appleAuth.getCredentialStateForUser(appleAuthRequestResponse.user);
           
             // use credentialState response to ensure the user is authenticated
             if (credentialState === appleAuth.State.AUTHORIZED) {
               // user is authenticated
                   const { identityToken, email, user } = appleAuthRequestResponse;
                   const decodedToken: tokenType = jwtDecode(identityToken!);
                   console.log('email_from_decodedToken', decodedToken.email);
                   console.log('email', email);
                   console.log('user', user);
             }
           
           } catch (error) {
               if (error.code === appleAuth.Error.CANCELED) {
                   // login canceled
               } else {
                   // login error
               }
        }
    }

에러 1. AuthorizationError 1000

App 실행 후 로그인을 시도해보면

AppleLogin Error: The operation couldn’t be completed. (com.apple.AuthenticationServices.AuthorizationError error 1000.)

라는 에러 문구를 만날 수 있다.

https://github.com/invertase/react-native-apple-authentication/issues/9


Auth failed with com.apple.AuthenticationServices.AuthorizationError error 1000 · Issue #9 · invertase/react-native-apple-auth

I'm testing this on a simulator with iOS 13.2.2 (Sign-in with Apple available) I get the Apple Sign-in button and the auth popup shows up perfectly. Upon entering password, I get the following ...

github.com

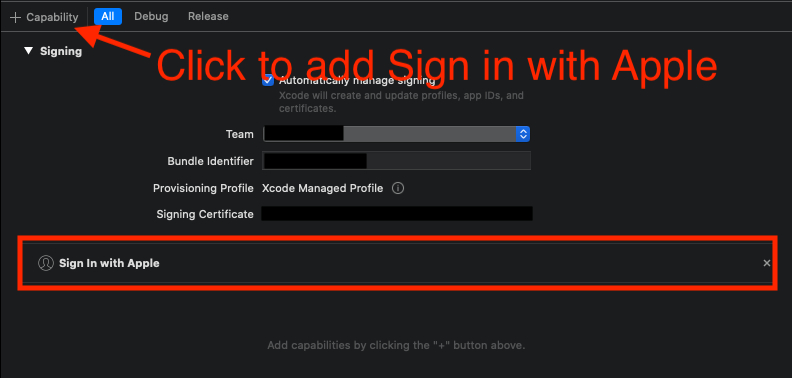
Xcode에서 프로젝트 .xcowrkspace를 열고 Capability를 눌러 Sign In with Apple을 추가한다.


또한 에뮬레이터에서는 정확한 동작이 되지 않는 경우가 있으므로, 실제 device 상에서 동작을 test하는 것을 추천한다.

에러 2. not supported device

Error: AppleAuth is not supported an the device. Currently Apple Authentication works on
iOS devices running iOS 13 or later. User 'AppleAuth.isSupported' to check device is supported
before calling any of the module methods


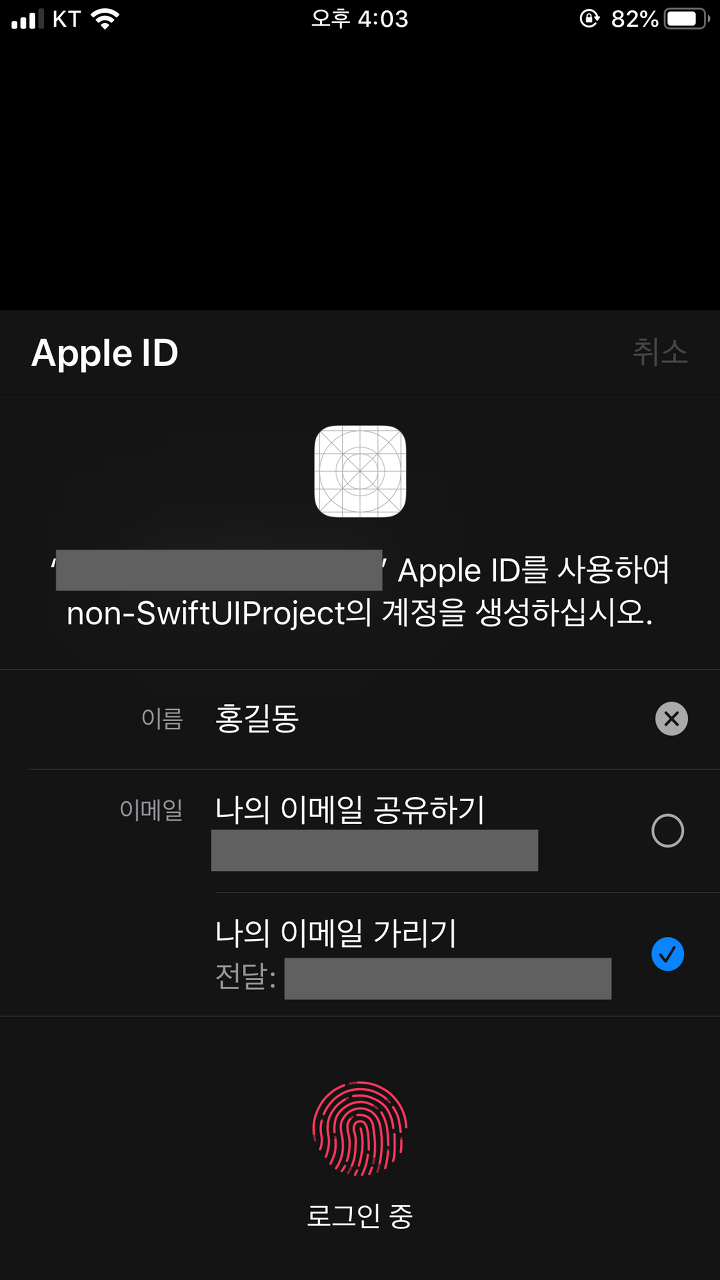
기타 + @privaterelay.appleid.com 이메일

Apple ID 로그인 시 "나의 이메일 공유하기" 와 "나의 이메일 가리기" 이렇게 두가지 옵션이 있다. "나의 이메일 가리기"를 선택하여 로그인을 진행한다면 위의 email에 자신의 고유한 이메일이 아닌@privaterelay.appleid.com 형태의 이메일이 반환된다.

이는 Apple의 https://support.apple.com/ko-kr/HT210425에서 더 자세한 내용을 참고하길 바란다.

기타 +로그인 재설정

developer의 입장에서 test 시 최초 한번만 email이 반환된다는 것 때문에 로그인을 재설정하고 싶을 때가 있다.


설정(Setting) → 애플 계정 → 암호 및 보안(Password & Security) → Apple ID를 사용하는 앱(Apps that use your Apple id) → 해당 App을 누른 뒤 Apple ID 사용 중단을 누르면 된다.


애플의 정책 변경으로 인해 구현해야 되는 것이 늘었다...제길


base64 string

var base64Icon = 'data:image/png;base64,iVBORw0KGgoAAAANSUhEUgAAABAAAAAQCAMAAAAoLQ9TAAAA
GXRFWHRTb2Z0d2FyZQBBZG9iZSBJbWFnZVJlYWR5ccllPAAAAwBQTFRF7c5J78kt+/Xm78lQ6stH5LI36bQh6
rcf7sQp671G89ZZ8c9V8c5U9+u27MhJ/Pjv9txf8uCx57c937Ay5L1n58Nb67si8tVZ5sA68tJX/Pfr7dF58tB
G9d5e8+Gc6chN6LM+7spN1pos6rYs6L8+47hE7cNG6bQc9uFj7sMn4rc17cMx3atG8duj+O7B686H7cAl7cEm7sR
M26cq/vz5/v767NFY7tJM78Yq8s8y3agt9dte6sVD/vz15bY59Nlb8txY9+y86LpA5LxL67pE7L5H05Ai2Z4m5
8Vz89RI7dKr+/XY8Ms68dx/6sZE7sRCzIEN0YwZ67wi6rk27L4k9NZB4rAz7L0j5rM66bMb682a5sJG6LEm3asy
3q0w3q026sqC8cxJ6bYd685U5a457cIn7MBJ8tZW7c1I7c5K7cQ18Msu/v3678tQ3aMq7tNe6chu6rgg79VN8tN
H8c0w57Q83akq7dBb9Nld9d5g6cdC8dyb675F/v327NB6////AAAAAAAAAAAAAAAAAAAAAAAAAAAAAAAAAAAAAAA
AAAAAAAAAAAAAAAAAAAAAAAAAAAAAAAAAAAAAAAAAAAAAAAAAAAAAAAAAAAAAAAAAAAAAAAAAAAAAAAAAAAAAAA
AAAAAAAAAAAAAAAAAAAAAAAAAAAAAAAAAAAAAAAAAAAAAAAAAAAAAAAAAAAAAAAAAAAAAAAAAAAAAAAAAAAAAAAA
AAAAAAAAAAAAAAAAAAAAAAAAAAAAAAAAAAAA/LvB3QAAAMFJREFUeNpiqIcAbz0ogwFKm7GgCjgyZMihCLCkc0nk
IAnIMVRw2UhDBGp5fcurGOyLfbhVtJwLdJkY8oscZCsFPBk5spiNaoTC4hnqk801Qi2zLQyD2NlcWWP5GepN5TOtSx
g1QwrV01itpECG2kaLy3AYiCWxcRozQWyp9pNMDWePDI4QgVpbx5eo7a+mHFOqAxUQVeRhdrLjdFFQggqo5tqVeSS4
56UEQgWE4/RBboxyC4AKCEI9Wu9lUl8PEGAAV7NY4hyx8voAAAAASUVORK5CYII=';

Image 컴포넌트

<Image 
style={{width: 100, height: 50, resizeMode: Image.resizeMode.contain, borderWidth: 1, borderColor: 'red'}}
source={{uri: base64Icon}}/>


style로 width와 height를 반드시 설정해줘야 출력이 된다.


npm install base-64

.d.ts 를 지원하므로 typescript로 작성한다면 @types/basic-64를 설치하면 됨.


import base64 from 'base-64';

let username = 'user';
let password = 'passwd';

let headers = new Headers();

//headers.append('Content-Type', 'text/json');
headers.append('Authorization', 'Basic' + base64.encode(username + ":" + password));

fetch(url, {method:'GET',
        headers: headers,
        //credentials: 'user:passwd'
       })
.then(response => response.json())
.then(json => console.log(json));
//.done();

function parseJSON(response) {
return response.json()
}

나의 경우 아래와 같이 작성함

        let data = {
            method: 'POST',
            // body: JSON.stringify({

            // })
            headers: {
                Accept: 'application/json',
                'Content-Type': 'application/json',
                'Authorization': 'Basic ' + base64.encode('user:password')
            }
        }

        fetch(`http://url`,data)
        .then((response)=>response.json())
        .then((json)=>{
            console.log(json);
        })


+ Recent posts